 Code Visualized
Nowadays, setting up and running a Virtual Machine in the cloud is for everyone! Easy to set up and easy to use, cloud computing gives worlds of opportunity that until recently was squarely in the domain of the super users.
In this article, I will show you how to set up a virtual compute instance on Google Cloud and install and configure Ubuntu 20.04 with remote access using NoMachine.
First some words of warning...
This setup will cost you money! If done properly, not a lot of money, but still money nonetheless.
As with anything done in the cloud, be aware! There is no limit on the money that you could spend if you are not careful, so be sure to research and be comfortable with the commands and steps shown in this article.
With that said, let's get started!
# Setup
First, if you have not done so already, please make sure you have a Google Cloud Account. If you need to setup an account, go to Google Cloud (opens new window).
Click on signup and go through the prompts. You may use any Google account to signup. New users get a free trial credits, but for this article I will assume you are a paying customer and will set up a VM instance in the most cost effective way possible. For configurations that are not part of the free trial such as the configuration recommended in this article, you will have to set up a credit card and a billing account.
# Step 1: Set up VM Instance
- Go to the Google Cloud Console (opens new window)
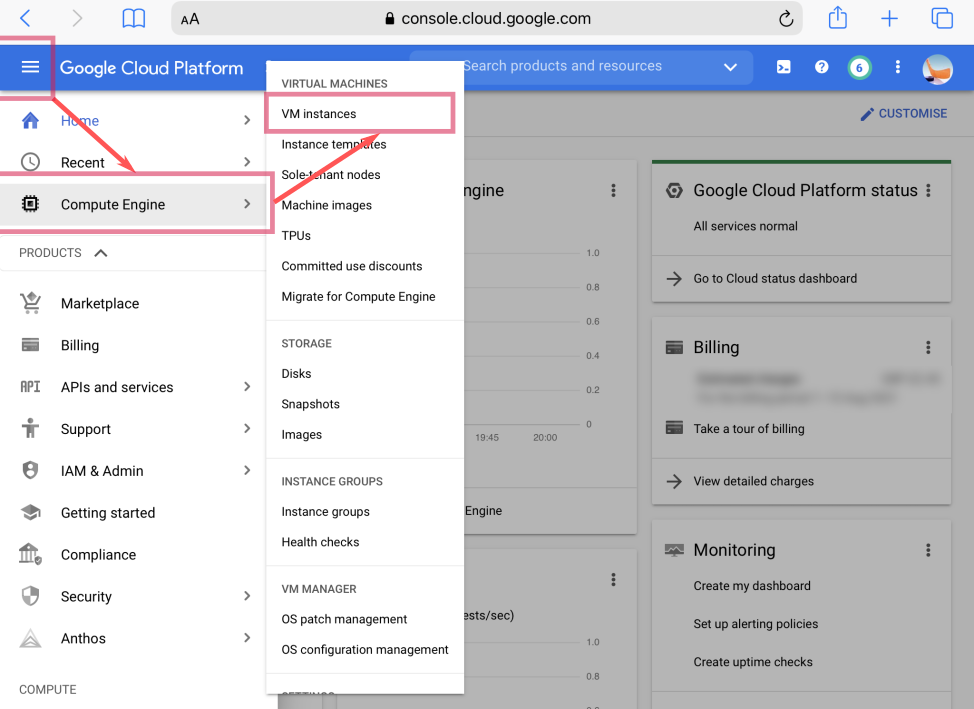
- Click on the menu and select the follow options:
Menu > Compute Engine > VM instances > Create Instance
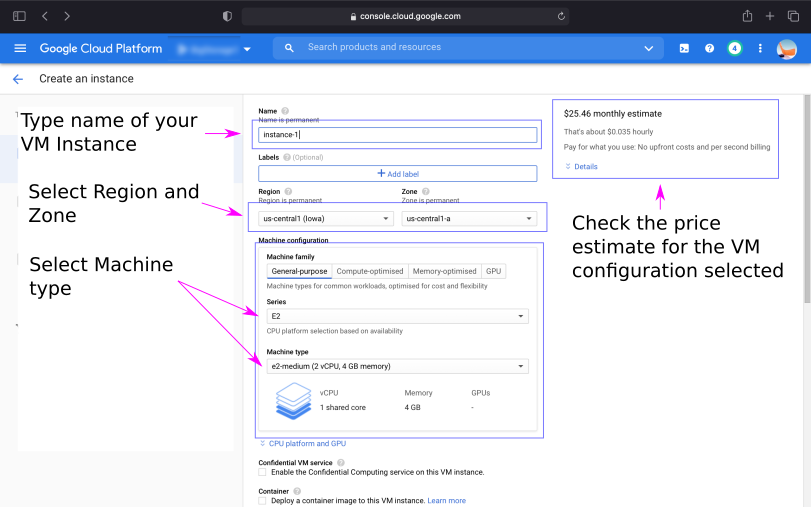
Type in a name for your instance under Name.
Remember that the name is permanent and cannot be changed once created.
Every VM Instance is tied to a region and a zone. Conventional wisdom states that you should pick one that is close to where your users are to minimize response times. A good link to check the response times near you based on your GCP ping (opens new window).
However, if you are running things as a hobby, response times are secondary to cost. The cheapest operating costs are locations in the United States. Even if you are located in Europe, you still will get acceptable response times if you choose a US location. The zone is arbitrary, go with the Google selected default.
The region and zone is permanent and cannot be changed once the VM Instance is created.
Now you are presented with a menu of options with the ability to choose different types of machines, memory, and operating systems.
Starting with machine types, Google Cloud offers four options, as noted in the Google website:
General-purpose: best price-performance ratio for a variety of workloads.
Compute-optimized: highest performance per core on Compute Engine and optimized for compute-intensive workloads.
Memory-optimized: ideal for memory-intensive workloads, offering more memory per core than other machine families, with up to 12 TB of memory.
GPU: ideal for massively parallelized Compute Unified Device Architecture (CUDA) compute workloads, such as machine learning (ML) and high performance computing (HPC). This family is the best option for workloads that require GPUs.
See Google Cloud Machine Types (opens new window) for a complete descriptions of the different machine types and a comparison table to help you choose the VM Instance that is right for you.
For this setup, we will go with the general-purpose machine type E2. This will work well for a small Ubuntu Desktop deployment. There are various options to choose from each with a different price. The smallest configurations are shown in the table below.
Machine Type Configuration e2-micro 2 vCPU, 1GB RAM e2-small 2 vCPU, 2GB RAM e2-medium 2 vCPU, 4GB RAM e2-standard-2 2 vCPU, 8GB RAM If you go to the official Ubuntu website, you are presented with the following page of requirements.
If you go with Ubuntu's recommendations, E2-standard-2 (2 vCPU, 8GB RAM) would be the machine type for you. However, this choice also comes with a higher cost. As a hobbist, I will try to get away with the lowest cost machine I can, so e2-medium is the machine type for me. From personal experience, e2-medium works great for developer type of applications like VS Code and running web servers in the background. I have on occasion, froze the machine if I am running a heavy load of applications. But since I am a hobbyist and not a mission critical developer, that is an acceptable trade-off for me. As with many things, experiment and trial different configurations to see what works for you. Google gives you an estimate of the monthly costs at the top right corner. The great thing about Google is that it will give you recommendations if the machine type or memory needs to be higher based on your past usage. So if you do get it wrong, it is easy to change the VM instance to a different configuration.
Select the following:
Machine Family: General-purpose
Series: E2
Machine Type: E2-medium (2 vCPU, 4 GB memory)
Confidential VM service - leave blank
Container - leave blank
Boot Disk: To configure the boot disk and the operating system, click Change. From there you can select Ubuntu under operating system, and you can choose different versions. For this example choose the following and click Select:
Operating System: Ubuntu
Version: Ubuntu 20.04 LTS
Boot disk type: Balanced persistent disk
Size (GB): 30
For disk size 30GB is a reasonable size. Once the disk is created, you will only be able to increase the size if you need to increase capacity but you will not be able to decrease size in the future. If you need to decrease size, you may need to create a new disk and copy in your files manually.
Identity and API access - Go with the default options
Firewall - Click on both boxes to allow HTTP and HTTPS traffic
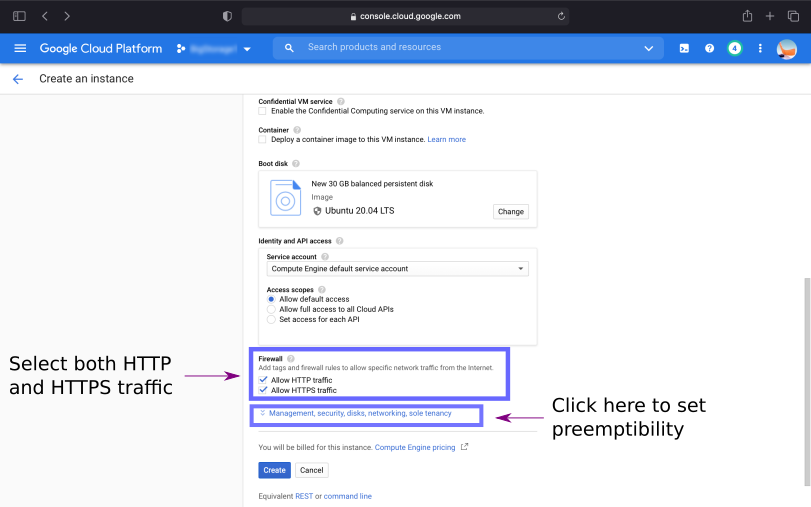
- Optional Step - Management, security, disks, networking, sole tenancy - This is a hidden menu. Go ahead and click to show further configuration options.
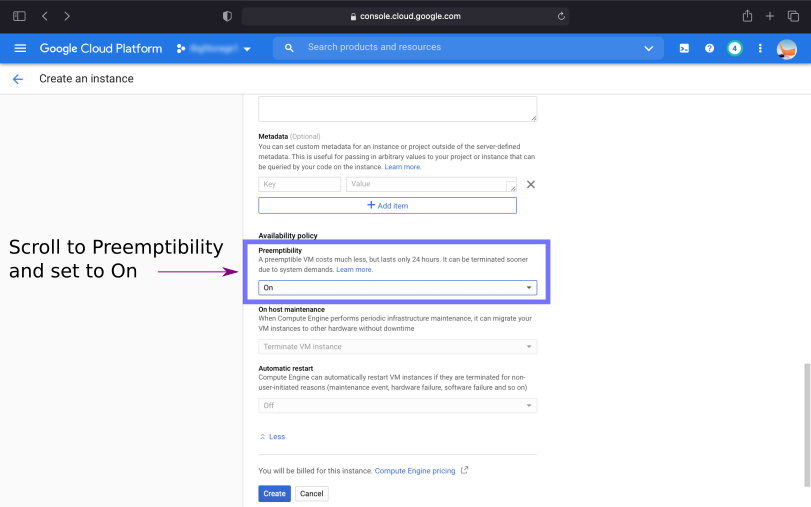
Most guides I found never tell you about how you can save even more money on your VM Instance by allowing the instance to be preemptible. This means that at any time, should Google need additional capacity, it could shut down your instance and reallocate the resources elsewhere. As a hobbist, I do not need to have the VM instance run 24/7, so it is okay if the instance where to stop unexpectately. The advantage is the pricing is significantly cheaper. As I will point out below, my instances only run when I am using it. For the times that I am not using the VM, I will stop the instance, saving even more money. A premptible instance will never run more than 24h.
If I have not lost you at this point, to turn on preemptibility, scroll down to the Availability policy and set Preemptibility to On.
Remember: You only need to consider preemptibility if you are a paying customer. If you are a new customer with free credits, you can skip this step.
- At this point you are ready to create the instance. Scroll down the bottom of the page to create the instance.
# Step 2: Installing Ubuntu Desktop and setting up admin user
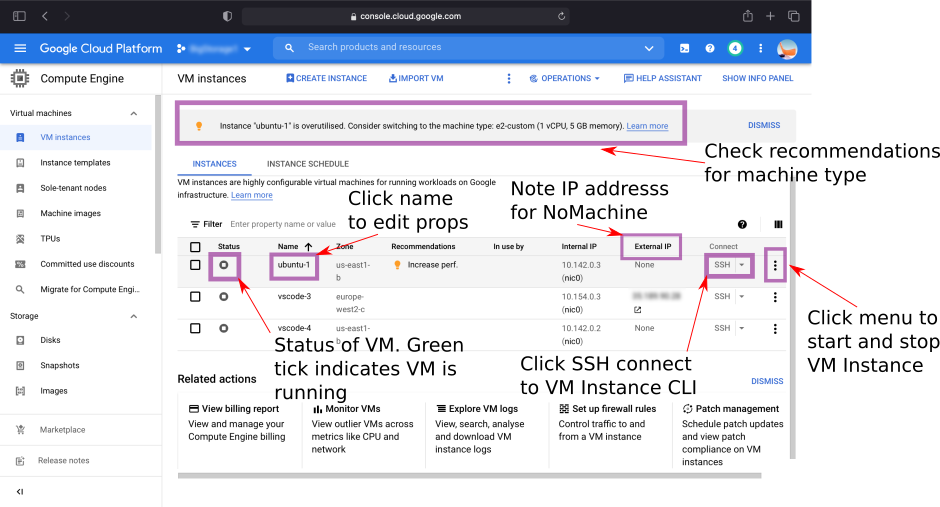
- Once the VM instance is created you will be taken back to the VM Instance page, and you should see your VM Instance listed. A green tick indicates that the VM instance is running (and charging you money). Click on SSH to create a secure window to access the Ubuntu CLI for your VM.
Type in the following commands:
sudo apt-get update
sudo apt-get upgrade -y
sudo apt-get install ubuntu-desktop
The installation of Ubuntu Desktop will take awhile, so go make yourself a cup of tea and come back to check on its progress.
Create a new user and assign admin privileges (replace demo with the username of your choice):
sudo adduser demo
sudo usermod -aG sudo,adm demo
You will be prompted to enter a password for the new user.
Now you need to change a configuration file:
sudo -i
vim /etc/ssh/sshd_config
You will be brought in the VIM editor. Type "i" to go into insert mode. Scroll down to PasswordAuthentication and edit text to "yes". Hit ESC key and type ":wq" to save the file.
# Step 3: Install NoMachine Server on the VM Instance
While still in the superuser mode (noted by the root@demo prompt), type the following commands to install the nomachine server:
sudo apt update

sudo apt -y install wget

wget https://download.nomachine.com/download/
7.6/Linux/nomachine_7.6.2_4_amd64.deb (Command all on the same line)

sudo apt install ./nomachine_7.6.2_4_amd64.deb
Note: To get the latest version, go the the nomachine (opens new window) website, click on other downloads, then click on NoMachine for Linux DEB amd64. You can replace the version number above with the latest version number on the website.
Reboot your VM Instance by typing:
sudo rebootThis will terminate your SSH window.
# Step 4: Configure the firewall on the VM Instance to open port 4000
- You will need to create a firewall rule to allow access to port 4000. From your google cloud console, go to VPC Network > Firewall rules > Create a firewall rule.
- Give the rule a name like nomachine-firewall.
- Under Source IP ranges, type "0.0.0.0/0".
- Click TCP under "Protocols and ports" and type in the box 4000.
- Click Create to create the rule.
- Go back to VM Instances and click on your VM Instance name, then click Edit.
- Go to "Network tags" and type in the name of the firewall-rule, in this case nomachine-firewall.
- Go to the bottom of the page and click on Save.
# Step 5: Install NoMachine Client on your computer
Go the NoMachine (opens new window) website and click on the download button for your computer to download NoMachine client.
Install NoMachine, following the installation prompts.
Open NoMachine and click to add connection.
Give a name for your connection and enter the external IP address of your VM Instance. The external IP address can be found on the Google Cloud console VM Instance page.
Leave the default settings for port 4000 and protocol NX.
Hit Connect and enter the login in details for the username that you set in Step 2.
You be asked to confirm the security and be asked about various various connection configuration options. Just accept the default settings for now. You will be able to return to the settings to make any changes that you need.
If everything was successful, you should have a connection to your new Ubuntu Desktop running in the Google Cloud.
# Step 6: Install Snap Store (Optional)
On my installation, the Ubuntu Snap store for applications did not automatically install. To allow to add apps easily, you can manually install the store by the following command:
sudo snap install snap-store
# Last Words
At this point, you are up and running with your Ubuntu Desktop.
To avoid any uncessary charges, be sure to Stop your VM instance when you are not using it. This can be done from the Google Cloud Console - VM Instance page, by clicking on the menu on the right for your instance, and selecting Stop.
Remember, each time you start your instance, you may be assigned a different external IP address. Be sure to update your NoMachine connection with any updated IP address for the machine. It is possible to assign a static IP address (at an additional cost) to your VM Instance.
Keep a watch on the costs in the Google Cloud Console! There are different ways to monitor your spend and you can get estimates of cost from their pricing page. You can also set up spending notifications if you exceed a quota or limit. Remember, these notifications do no stop you from spending money; it will just warn you that your limits have been exceeded. There are all kinds of stories on the internet of people who were faced with outrageous bills by making simple mistakes in their cloud setup. Don't be one of these people! Do your homework and be sure of your configuration before billing starts.
Here are a few links that I used to help me set up a VM Instance on Google Cloud.
Accessing your remote desktop on Google Cloud Platform via NoMachine (opens new window)
Good luck and have fun!